WEB暴力破解–我用wvs fuzzer
鬼仔注:以前发过Acunetix Web Vulnerability Scanner V5.1 破解版
Writer: demonalex[at]dark2s[dot]org
讲到WEB暴力破解通过大家都会用小榕的溯雪,但并不是所有WEB破解溯雪都是应付自如的(不要说我说小榕他老人家的坏话),最近因为工作的关系,碰到一个网管型设备的WEBPORTAL需要做WEB破解,看看HTML的源码:
…

<script language=javascript>

function login_send()

{

var f, p, page, url, option;

f = document.form_login.forced_in.value;

u = document.form_login.username.value;

p = document.form_login.passwd.value;

pg = document.form_login.page.value;

url = "atm_login?username="+u+"&passwd="+p+"&forced_in="+f+"&page="+pg;

option = "toolbar=no,location=no,directories=no,status=no,menubar=no,scrollbars=no,favorites=no,resizable=no,left=230,width=520,top=120,height=300";

window.open(url, '_blank', option);

}

</script>

…

<form name='form_login' action='__Javascript:login_send();'>

<input type='hidden' name='forced_in' value='false'><input type='hidden' name=page value=''><input type='hidden' name='redirect_portal_ip' value=''>

<tr height=25%><td colspan='2'><img src='images/login-men.gif' width='177' height='22'></td>

<td width='27%' rowspan='4'><img src='images/l-hand.gif' width='148' height='141'></td></tr>

<tr height=25%><td width='28%' class='inputlabel'>Username:</td>

<td width='45%'><input name='username' type='text' value='' style='width:120px' class='inputbox'></td></tr>

<tr height=25%><td class='inputlabel'>Password:</td>

<td><input type='password' name='passwd' value='' style='width:120px' class='inputbox'></td></tr>

<tr height=25%><td> </td>

<td><input type=image src=images/login-go.gif width='71' height='22'></td></tr>

</from>

…
这里form的action是交给一个本地的javascript自定义函数– login_send来完成的,用溯雪的话:

看来是因为调用了javascript的关系吧…
怎么办?就这样放弃吗?这也大可不必,调出wvs(Acunetix Web Vulnerability Scanner,相信都不少同志都用过它吧?我用的是4.0,目前最新的版本是5.x),选择它的HTTP fuzzer功能:

然后怎么使用它呢?我整理了一下流程(其实和溯雪的原理差不多,不过可能需要更深入的了解HTTP的相关知识):
定义HTTP请求(Request)-》定义暴破运算参数(Add generator)-》插入暴破运算参数(Insert into request)-》定义成功触发特征(Fuzzer Filters)-》扫描(Start)
下面讲将具体实操,首先我们从目标的HTML代码可以看到,其实登陆过程是通过POST的四个参数[–两个隐藏参数(forced_in与page)与两个提交参数(username与passwd)]至本页的login_send函数,然后再通过GET atm_login这个页面提交认证数据。因此在使用wvs fuzzer前我们首先需要定义提交HTTP请求的内容,具体如:
GET http://xxx.xxx.xxx.xxx/ atm_login?username=alex&passwd=demon&forced_in=false&page= HTTP/1.1
User-Agent: WVS/4.0
Accept: */*
下面是加入暴破运算参数至HTTP请求内容中,基于我们本次的目标是帐号(username字段)与密码(passwd字段),因此需要定义两个运算参数,本例中我打算让username进行暴力破解,而passwd则进行字典破解。
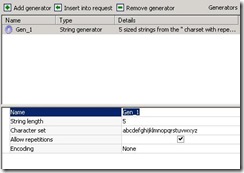
废话少说,先建立一个基于暴力破解的username运算参数:点击“Add generator”-》“Random string generator”后得到:

在“String length”中填入值的长度,我这里选择5;“Character set”中输入可能需要用到的字符,我这里选择26个小写字母;选择“Allow repetitions”—允许重复使用各字符。
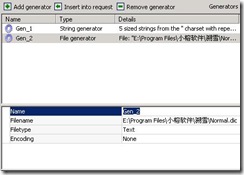
然后再加入一个用于通过字典破解passwd字段的运算参数:点击“Add generator”-》“File generator”后得到:

“Filename”为字典文件的路径;“Filetype”则为读取内容的格式,多数为文本(Text)。
下面要做的工作就是将两个运算参数加入HTTP请求中。首先在选择本例中username的值(本例为alex),然后选择Gen_1,并点击“Insert into request”按钮,得到:

从右上角可以看到,目前的请求数量为11881376个(换句话说,有11881376个组合)。再以相同的方式用Gen_2替换passwd字段的值(本例为demon),得到:

嘿嘿,现在的请求数大到差不多等于无限了吧???…
接下来就是定义确认‘登陆成功’的过滤器(Fuzzer Filter)。点击“Fuzzer filters”进入定义过滤器的界面,默认情况下只有“200”的过滤器是激活的,去掉它前面的勾勾,然后自己定义一个名为success的过滤器,由于本例中若登陆成功的话应该是不会回到原有的登陆界面的,因此只需要定义一个‘排除登陆页面特征’的过滤器并激活就可以了:

来到这里,按下“OK”按钮确认刚刚对过滤器的设置。
最后回到HTTP Fuzzer主界面点击“Start”按钮即可启动本fuzz任务,剩下的工作就是‘守株待兔’了—等待“Results”分页的fuzz结果,嘿嘿,Good LuckJ。
您好,我可以問您相關問題嗎?
小榕大哥的朔雪2已经可以提取这类表单了,还可以破验证码